Soil testing can have big impact on plant growth
Published 1:51 pm Friday, March 6, 2020
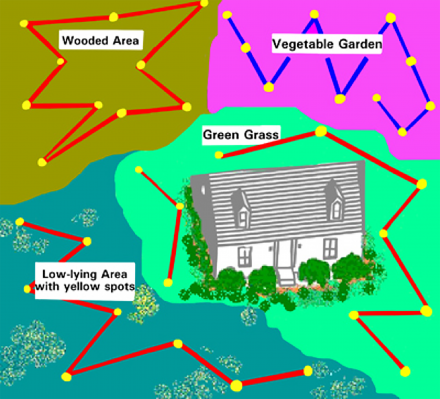
- the area divided according to vegetation and soil characteristics. Yellow dots indicate sampling points.
|
Getting your Trinity Audio player ready...
|
The first step to maintaining productive soils is a soil test. Soil tests provide information on the actual nutrients found in dirt. Test results are used to determine the amount and the types of nutrients in order for the best growth of a lawn, garden, or other types of plants.
Steps in soil sampling
Recommendations about when and how to apply nutrients are only as good as the soil sample submitted for analysis. To obtain a representative soil sample, the following steps are useful: identify sampling locations (zones), determine the sampling depths, use the right sampling tools, sample at the right time, and handle the samples accordingly.
1. Locations
Map out the area where the plants are to be grown or are presently growing. This will help in record keeping and ensure that the soil is taken from throughout the entire area. Divide the area such that each soil sample represents one plant type or condition. An area that has been divided according to obvious differences in plant types, plant performance, soil types, and drainage is shown in Figure 1. Use a zigzag approach when taking samples. Collect 8-10 soil samples from each location (zone) as shown in Figure 1. For trees and shrubs, take soil samples from six to eight spots around the dripline of the plants.
2. Depth
The depth of sampling depends on the type of plants being grown. For lawns, sample to a depth of 4 inches. For gardens, ornamentals, mixed fruit trees, and wildlife plots, sample to a depth of 6 inches.
3. Time
Soil sampling should be done well in advance of planting or spring green-up. This allows adequate time for sample analysis, data interpretation, and fertilizer and lime application. Now would be a great time to gather samples, but only if the soil is moist to dry. Do not gather wet soil. Once medium or high fertility levels are established, lawn and ornamental areas need to be sampled every two to three years. Vegetable gardens should be sampled every 1 to 2 years.
4. Tools
Use clean sampling tools and containers to avoid contaminating the soil sample. Never use tools or containers that have been used for fertilizer or lime. Collect samples with tools like trowels, shovels, or spades.
5. Procedures
Clear the ground surface of grass thatch or mulch. Using a trowel, push the tool to the desired depth into the soil. Push the handle forward, with the spade still in the soil to make a wide opening. Cut a thin slice from the side of the opening that is of uniform thickness, approximately 1/4-inch thick and 2 inches in width, extending from the top of the ground to the depth of the cut, as seen in Figure 2. Collect from several locations. Combine and mix them in a plastic bucket to avoid contamination.
6. Handling
Samples should be air dried overnight. Dry samples on a flat surface lined with clean white paper. Take care to avoid contamination. After drying, transfer the sample to the soil sample bag and bring it to the Decatur County Extension office. Bags are provided at the office, and when shipped, are $7.00. The sample will be sent to Athens to the soil lab to be analyzed. The analysis takes two to three working days from the time the lab receives the samples. In general, it takes 7 to 10 days from the time we receive the samples to the time you get your test reports back. The Soil Test Report provides an interpretation of all soil tests done by the Soil Testing Lab and is accompanied by appropriate nutrient and lime recommendations. If you need further information about your test results, contact the Decatur County Extension office at 229-248-3033.
The information from this particle was provided by Soil Testing for Home lawns, Gardens, and Wildlife Food Plots.